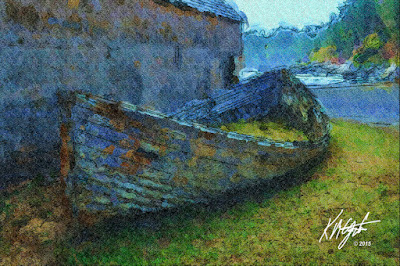
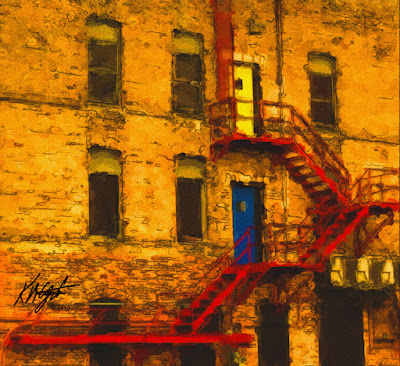
Pages

Friday, October 30, 2015

"How this was Done: Street Scene Stairway Pastels" Corel

Street Scene Stairway Pastels

  • Street Scene Stairway
    • Corel Painter Essentials 5
      • Effects; Equalize
        • Black and White Points
        • Black 0%
        • White 65.9
        • Gamma 38%
      • Adjust Color
        • Uniform Color Setting
          • Hue Shift 0%
          • Saturation 82%
          • Value -25%
      • Select Pastel Drawing
        • Chalk, Pastels, Crayons
          • Square Chalk Brush
          • Straight Line setting
          • Size 14.3
          • Opacity100%
          • Grain 12%
          • Rough Charcoal Paper
    • Corel PSP Pro X3
      • Added Signature
        • Placed as new Layer
        • Sized to fit
        • Placed on image
        • Property Lighten
        • Merged all Layers
        • Saved iteration
          • Resized for display on Blog Post
Another fine photograph from Morguefile Free Photos. I did miss a step I took in the outline: I used a new layer to paint on for the Sky, using the Eye Dropper to select a blue from the image. Sometimes my notes get a little skewed! My apologies to the reader for my error.


Thursday, October 29, 2015

"How To: Hills, Mountains, Cloudy Skies Oils Plus" Corel

Hills, Mountains, Cloudy Skies

These are the Programs and settings I used to create today's image. I am still experimenting with the outline format. Please let me know if you prefer this format or a Narrative Style format explaining how to use the stated Programs. Comments welcome!
  • Corel Painter Essentials 5
    • Landscape – Hills, Mountains, Cloudy Skies
      • Effects
        • Tonal Control
          • Increased Saturation
      • Select Oil Painting
        • Acrylics and Oils
          • Real Wet Brush
          • Size 25
          • Opacity 100%
          • Freehand Brush setting
          • Artists Rough Paper
          • Paint with these settings
      • Select Detailed Watercolor
        • Still using Real Wet Brush
          • Size 10.2
          • Opacity 82%
          • Straight Brush
          • Same Paper setting
          • Paint with these settings
          • Stop before complete for just light effect
      • Select Colored Pencil Drawing
        • Pencils, Pens and Markers
          • Dry Ink Brush
          • Freehand Strokes
          • Size 31.5
          • Opacity 24%
          • Grain 100%
          • Same Paper setting
          • Paint with these settings
          • Stop before complete for just light effect
  • Corel PSP Pro X3
    • Adjust
      • Smart Photo Fix
        • Brighter 32
        • Shadows -10
        • Highlights -5
        • Saturation 50
        • Focus- Original 47
      • Opened Signature
        • Placed as new layer
        • Sized to fit
        • Merged all Layers; Added 10 pixel Black Border
This photograph was from the Morguefile Free Photos. I truly appreciate their sharing some very good compositions for Digitally Painting and adjusting.

Wednesday, October 28, 2015

"How to: Pier at Sunset - Impressionistic - Pen and Ink" Corel

Pier at Sunset - Impressionistic - Pen and Ink
This photograph is from Unsplash Free Photos. I selected it for the perspective and great color of the Sunset. Below are the Programs and Settings used to create todays Digital Painting:
  • Corel Painter Essentials 5
    • Impressionist Painting
      • Impressionist Cloner Brush
      • Size 19.0; Opacity 100%
      • Straight Line Setting
      • Concrete Paper
    • Pencils, Pen, Markers
      • Felt Marker Brush
      • Size 8.3; Opacity 21%; Grain 21%
      • Concrete Paper
      • Straight Line Setting
        • Paint two times
        • Switch to Curved Line Setting
          • Paint once more
    • Save large iteration
  • Picasa 3+
    • HDR tool
      • Mid High Radius
      • Medium Strength
      • Low Fade; Apply and Save
  • Corel PSP Pro X3
    • Smart Photo Fix
      • Brighter +12
      • Shadows -20
      • Saturation; More Colorful +50
      • Focus; Original 26
    • New Layer for Signature
      • Open Signature file
      • Resize
      • Place
    • Merge all layers
    • Save Large iteration 72dpi
    • Resize Image for display
    • Save with New name

I hope this format is informative, I want to explain a bit more of what I do to create my Digital Visual Artworks. Comments and shares always welcome!

Monday, October 26, 2015

"Steps and Settings: Late Autumn Walker On a Dirt Road." Corel

"Late Autumn Walker On a Dirt Road."


I've had a busy weekend so not much time to work on any Digital Paintings. Today I started about 12:30pm to work on the computer and I found time for one. The photograph is from Morguefile Free Photos, a landscape. It depicts a "Late Autumn Walker On a Dirt Road."

I opened in Corel Painter Essentials 5 and tried a few settings for the image. I settled on an Oil Painting, Concrete Paper Texture, choosing from the Photo Painting Brushes I picked the Grainy Variable Pencil. The Opacity was set at 74% and the Grain to 12%. I then Digitally Painted this piece using those settings.

Saving the large iteration I opened in Corel PSP Pro X3. Here I decided to add an Ornate Frame with the Inside Image setting. I opened and copied my signature and Placed as New Layer into the piece. I resized it and placed it and applied the Property setting Lighten for transparency. I merged the layers.

Next I used the Smart Photo Fix tool and upped the colors. And I used Increase to RGB 16-bit on the whole image.

I like the museum look and feel of the Ornate Frame, and the colors and detail of the Grainy Variable Pencil within the making of this image. I saved the large iteration and then resized for display.

Thursday, October 22, 2015

"How To: Two Images Digitally Painted in Painter Essentials 5" Corel

Old Boat

Red Escape Stairway

I went ahead and purchased Corel Painter Essentials 5 at 30% off. I welcome it into my arsenal of Digital Visual Art Programs. It will accomplish much as I create new Digital Visual Artworks. And it is a Current Version supported by Corel Corporation. A big plus as much of what I use are Legacy Corel Programs, which sometimes work wonky with Windows 10.

I perused Morguefile for Free Photos this afternoon and discovered a few photographs I plan to Digitally alter and display here on gatzkART!. Take for instance this image I worked on today. An Old Boat no longer in use, beached for a while it seems. I opened it in Painter Essentials 5 and digitally painted as a Watercolor Sketch, a Wet brush, and regular paper. I used the color palette from the original photograph. After it was painted I selected Apply Surface Texture, using an angular texture. I saved that large iteration.

I opened this in Corel PSP Pro X3. Here I applied the Smart Photo Fix, brightening it, increased the color, and shadows. I then used the Curves to add depth to the colors. I upped the Saturation Vibrancy by 33 for that punch I like. I added my signature, which I finally placed in it's own folder to find the black or white one easier. I fit and placed it using the property Lighten for transparency. I saved this large file again.

I resized for display and then adjusted the Curves again as some depth was lost in downsizing. I saved that file at 150dpi RGB 8-bit JPG.

Still testing Corel Painter Essentials 5 I used a Building with Red Escape Stairs for my subject today, also from Morguefile Free Photos. I used the Watercolor Sketch setting, Tapered Camel Brush, Worn Pavement Paper and I also added back in some details. I used the Acrylics & Oil Glazing Round Brush for that. I upped the Saturation in Essentials 5.

I then opened in Corel PSP Pro X3 and added Saturation Vibrancy for the pop to the colors. Here I also added my signature file as a layer, sizing it and placing it, applying the property Multiply for transparency. I merged all layers and saved the large file at 150dpi, RGB 8-bits.

I saved this almost square Digitally Painted photograph for display by resizing it still at 150dpi and RGB 8-bits, JPG.

I am thoroughly enjoying using Corel Painter Essentials 5 and it's diverse selection of brush variants and settings for creating Digitally Painted Visual Artworks. I would recommend this program to those who would like to create great paintings digitally. It is still on sale at 30% off until midnight October 22, 2015, that's tonight. Search for Corel Corporation and Painter Essentials 5 for the sale.

Tuesday, October 20, 2015

"Painter Essentials 5 Test Digital Collage" Corel - Picasa

Painter Essentials 5 Test Digital Collage


I received a Sale deal from Corel today. Their Painter Essentials 5 is 30% off. They have a 30 Day Trial, so I downloaded that. Though the Sale is only until the 22nd at Midnight I wanted to see the advantages of it over Painter Photo Essentials 4, a legacy program.

I opened the trial and began playing with different settings on a number of free photographs from Unsplash and Morguefile. Needless to say it gave me some really interesting Digital Paintings. Oil, Modern, Illustration, Detailed Watercolor, Watercolor Sketch and Colored Pencil Drawing. With Version 5 there are more choices for Brushes, Paper, and others. Each type of painting you pick you can select a Brush, and Paper for your pleasure and mood. The Styles are an array of wonderment.

I took the Digital Paintings I had experimented with and used Picasa 3+ to create a Digital Collage, which you see here. It was so much fun I did not keep track of all the settings I chose. I saved the Collage and opened it in Corel PSP Pro X3. There I adjusted the Saturation Vibrancy, added my signature and saved the large Collage. I resized for display.

I am pretty confident I am going to purchase Corel's Painter Essentials 5, and retire Painter Photo Essentials 4. After all it is priced for $34.99 Download version.

Monday, October 19, 2015

"Steps to: Colorful Coastline - Digital Watercolor" Corel

Colorful Coastline
  • Download Free Photograph from Unsplash
  • Open in Corel Painter Photo Essentials 4
  • Paint Digitally as Watercolor Sketch, Rough Paper, Color Saturate, Dry Bristle Brush
  • Save large iteration
  • Open in Corel PSP Pro X3
  • Apply Smart Photo Fix, Increase Colors, Shadows
  • Applied Saturation Vibrancy set at 33
  • Add Signature layer, merge and save large file as JPG.
  • Resize Image for display here.

Wednesday, October 14, 2015

"White Bearded Man Portrait" Corel

White Bearded Man Portrait


Back to Bearded Men Digital Portraits in today's exercise. I saw this portrait online recently and was immediately taken by the man's countenance. I just wanted to digitally paint him. So I downloaded from Morguefile and began to think about the endeavor.

To give greater detail to the image I opened it in Corel Painter Photo Essentials 4 first. It began as a grayscale image, I used the Watercolor Sketch tool, Rough Paper, Saturate color (grayscale,) Dry Bristle Brush. I digitally painted it there for the sketchiness. This gave me a great piece to Digitally Paint by hand further in Corel Painter 11.

After I saved the large iteration I opened in Painter 11. I used my color palette with the Flesh tones and Earth tones appended, my current favorite palette. I used the Digital Watercolors Brushes, starting with a Coarse Dry Mop brush. I began to paint the fleshtones selecting ones darker than usual, and laid a background to work with. I added colors as I went selecting almost randomly. I varied the size of the brush as I painted, smaller to larger, back to smaller.

When I came to the Beard I selected the Liquid Ink Brushes for greater detail in his white hair and beard. I chose very small strokes for the beard and varied them only a bit as you can see, some larger some very small. This gave me a great effect for some realism sketchiness in the beard.

I painted the eyeglasses as Tortoise Shell, as the details indicated and the beginning photograph had shown. I selected a Digital Watercolor Green and some Yellow for the sweater, and background, adding in a touch of each to the face and eyes. I had layers of Digital Watercolor and Liquid Ink I selected all layers and Dropped all. This blended much of the colors together, as you will notice the green about the eyes. An unexpected result, perhaps a unhappy accident for the eyes only.

I saved the large iteration and opened in Corel PSP Pro X3, viewing it there I upped the colors by 33 in Saturation Vibrancy. I always use Vibrancy toward the punch that move brings to the pieces I paint digitally. I did not use Curves or the Smart Photo Fix at all on this image. Satisfied with the end result I added a layer with my signature, sizing and placing it, then merging the layers to one. Saved a large iteration then resized for display in this post.

Monday, October 12, 2015

"How this was Done - Musicians Digital Collage" Corel - Picasa

Musicians Digital Collage


As a Musician I enjoy seeing them working their craft. I garnered a few photographs of Musicians from Morguefile and selected four of them to present as Digital Visual Art. The selected four of the photographs I had downloaded from the Free Photos on Morguefile. I decided to do something a little different with them. I chose a Fiddle Player, Banjo Player, Acoustic Guitar Player and an Electric Guitar player. I had a Band without drums, not unheard of for Folk Rock Bluegrass.

I opened each one separately in Corel Painter Photo Essentials 4 and digitally painted them. The settings were the Watercolor Sketch, Rough Paper, Saturate Color, Dry Bristle Brush. I did each of the photographs with these settings for uniformity of execution.

After I saved each one I opened Picasa 3+ and selected them individually to use to create a Digital Collage of all four. I applied Picasa's Collage tool and set it as 8.5" X 11" format, Mosaic setting. I shuffled the photos until I had a balance of the four painted images. I generated the Digital Collage in Picasa. It was saved automatically as a large JPG image.

I opened that Collage in Corel PSP Pro X3. Here I applied the Smart Photo Fix tool, upping the color and the highlights just a bit, with a suggested brightening setting. I then used the Saturation Vibrancy tool on the Collage. I thought about applying the Curves to it but the colors were just right, so I did not. I added my signature as a layer and sized it and placed it with the Property of Lighten, merging the layers. I saved the large iteration.

As is my custom I next resized the piece for display in PSP Pro X3, 72dpi and full color.

So I am a Producer of Bands now! I created this group and they sound great! Well, if you could hear them like I do in my head, I am certain you would appreciate them.


Saturday, October 10, 2015

"How this was Done - Autumn Pathway - Classic Oils" Corel

Autumn Pathway - Classic Oils


I really appreciate the very good photographs you can find on Stockvault's Free Photos. This is one example. It is an Autumn Pathway with great composition and color. I downloaded it and opened in Corel PSP Pro X3, here I applied the Smart Photo Fix, upping the color, decreasing the highlights a bit. I applied the Saturation Vibrancy set at 33, then used the Curves to add depth to the colors.

What punch the photograph had then. I saved the large image at 300dpi. I opened it in Corel Painter Photo Essentials 4. Here I used the Classic Oils settings with rough paper, saturated colors and the Bristle Oil brush. I digitally painted the Autumn Pathway, saving the large iteration as a JPG.

I then opened it in Corel PhotoPaint and added my signature, I also resized for display. This image must be viewed at the largest size you can view it on your device or computer. The brushstrokes are amazingly curvy and make for a great piece.

Friday, October 9, 2015

"10 Minute Digital Collage - Textured Young Lady" Corel

Textured Young Lady Portrait


Another 10 minute Digital Collage is the subject today. I opened a Texture from Stockvault Friday Freebies of Yellow Painted Concrete in Corel PSP Pro X3. I also opened a portrait of a Young Lady from the Morguefile Free Photos in Paint.NET. In Paint.NET I changed the image to a Black and White photo, I applied the Artistic Ink Sketch, Coarse pen to that.

Saving that I opened it in PSP Pro X3 and placed it as a layer on the Texture. I adjusted the size of the Young Lady to fit the large Texture. Using the property Multiply I added transparency to the portrait. I added my signature and then upped the Saturation Vibrancy. I merged the layers and removed EXIF information from the image. I then simply resized for display. I adjusted the Curves to add depth to the piece and saved it.

All in all it took around 10 minutes and a tad to complete this Textured Digital Collage of the Young Lady.

Tuesday, October 6, 2015

"How To: Hewn Stone Steps" Corel

Hewn Stone Steps


Another Landscape diversion for me. I believe I got the photograph of the Hewn Stone Steps from Morguefile, but my records are not always accurate. So bear with me about the source of the file, please.

I opened the Stone Steps in Corel PSP Pro X3 and I adjusted it with the Smart Photo Fix, upping the color, decreasing the highlights, and a light brightening. I used the Curves to add depth to the colors. Then I applied the Saturation Vibrancy set on 33. I saved that iteration.

I liked the end result of my last Landscape so I opened this photograph in Corel Painter Photo Essentials 4. Here I selected the Classical Oil Painting settings to paint with. I also tried the Pastel Drawing, Watercolor Sketch, and Modern Painting settings, but my favorite was the Classical Oil.

I saved that file as a JPG, with my compression off. I opened the file in Corel PhotoPaint and added my signature. I attempted to rid the image of a small red object with the standard paint brush in PhotoPaint, but in Windows 10 OS the paint brush painted a inch line on the Steps, this had never happened before. I tried to eliminate the red object to no avail in PhotoPaint. So you may notice it in the painting.

I resampled the 300dpi image to a display size, saving that with compression set at 75 and smoothing at 25. I decided to try one more thing to get rid of the red object. I have done little painting with PSP Pro X3's tools, I reopened the display image in PSP Pro X3. There I selected the color-picker and chose some colors around the stone wall area. I selected the Airbrush tool and painted out the red object with a few differing colors. That was better.

I saved the file again and posted this for today's viewers.

Saturday, October 3, 2015

"How This Was Done - Sun Breaking Through a Foggy Forest" Corel

Sun Breaking Through a Foggy Forest


I received some Free Photographs from Unsplash today, I saved one to my computer. I then went to the Unsplash site and logged in and looked through many new and featured photographs. I was attracted to this one of a Forest of Birch and Pine Trees with the Sun Coming Through the Fog.

I opened Corel PSP Pro X3 and I upped the Saturation Vibrancy to 33, then I adjusted the Curves a tad. I went to Colors and adjusted the Fade to 45 for more depth to the colors. Being a large file from Unsplash I saved that iteration full size.

I opened Corel Painter Photo Essentials 4 and experimented with a couple of painting styles, Gouache, Wet on Wet Watercolor, and then I decided to apply the Classical Oil Paint settings to the entire image. This was the image I was hoping for. The foreground displaying the wild flowers, the birch trees standing out clearly and, the sun breaking through the forest with a bright cast of light. You can even see the fog in the left side coming out into the trees.

I really liked the end resulting piece. I saved the Painting in a new Folder, "OilPaint," with a new name. I then opened the image in Corel PhotoPaint and added my signature to the piece. I saved again without compression. I then resampled the image for display, with an appropriate name modification, setting the compression to 75 and smoothing to 25.

I usually like to do portraits, one of my favorite subjects to paint. But, I also like Landscapes with great composition and color. So I chose to do that today with the fine free photograph from Unsplash.