Pages

Showing posts with label Canon Rebel XTi. Show all posts

Friday, July 24, 2015

"The Simple Sunrise" Canon - Corel

Simple Sunrise

I was up very early just the other day and the Sunrise was very pretty, I put on a light jacket and grabbed my Canon Rebel XTi. Out the door I went. We have new stairs down to our lower deck, I transversed them keeping an eye out for a good shot of this Sunrise.

I took a number of shots simply in Landscape mode and Auto Mode, as it was a bit chilly. I had included the lake, Bald Eagle Lake, in a couple, but it wasn't reflecting enough of the sun and clouds in the water.

I took this Simple Sunrise, composing the clouds and tree tops surrounding it.

Later I opened it in Corel PSP Pro X3 and upped the Saturation Vibrancy by 33. I saved that large iteration after I added my signature. I then Opened it in Corel PhotoPaint to use Filter Forge's Frames adding a Film frame to the image. I resampled to display size and saved in JPEG format.

I kept my approach simple to this image. I like it very much without more processing. I hope you do, too.


Monday, September 8, 2014

"Five More Images Near Clare Michigan" Corel

The Trail to the House

Stump With Mushrooms and Ferns

Swamp Woods II

Swan Planter Empty

Windmill Tower II


Programs used:


  • Corel PSP Pro X3, Filter Forge Freepack Frames, "The Trail to the House"
  • Corel Painter Photo Essentials 4, Corel PSP Pro X3, Filter Forge Freepack Frames, "Stump With Mushrooms and Ferns"
  • Corel Painter Photo Essentials 4, Corel PSP Pro X3, "Swamp Woods II"
  • Corel PhotoPaint, Corel PSP Pro X3, "Swan Planter Empty"
  • Corel Painter Photo Essentials 4, Corel PSP Pro X3, "Windmill Tower II"
I used various steps for each of the above images from near Clare, Michigan. I did them a while ago, so I don't remember everything I did on each. So I have listed the programs I remember using. I most cases I do remember adjusting the Saturation Vibrancy on them to varying degrees.

I am Listening to "Paul Platt" on SoundCloud as I write this blog post. +Paul Platt great sounds for the background while posting. Thanks, Paul!


Wednesday, August 20, 2014

"Trellises Bark Siding Shed" Corel - Audacity and Line 6

Trellises Bark Siding

A simple post today. A touch of workflow. I took this photograph near Clare, Michigan, with my Canon Rebel XTi. I opened it in Corel PhotoPaint. There I applied Local Equalization and used the Tone Curve for upping the color depth a bit.

I opened the saved large iteration in Corel PSP Pro X3 and flipped the photograph. I added Vibrancy with the Saturation tool. I also added a layer of my signature in white, which doesn't detract from the image a bit. I adjusted the size for display here and saved the medium file.

I have been experimenting with my Music using my Line 6 PodXTLive, and the Gearbox software. I used a drum backtrack that was fast rock and a beginning sound like a jet taking off. I had opened this in Audacity. I recorded E7 A7 B7 riff and also a Am Em G D riff on a subsequent new track with a differing beat. In other words I played around with two drum tracks and used a Clean guitar tone called "Clean Guitar Tone," to lay down a rhythm track through the Pod.

I used a different tone for the lead playing on both tunes. On the Am tune I used the tone Avenge-fold Seven. And on the E7 tune I used a Blues tone setting.

I played the leads, adjusted the timing in Audacity due to the Latency. I ended up with two fun tracks without vocals for my own enjoyment. I am getting used to the PoDXTLive and like it quite a bit thus far. I don't currently have the funds to purchase DAW Software so Audacity is my choice above other free recording software. For a free recording type of software it is very good to use. One of the best in my humble opinion.

Tuesday, August 12, 2014

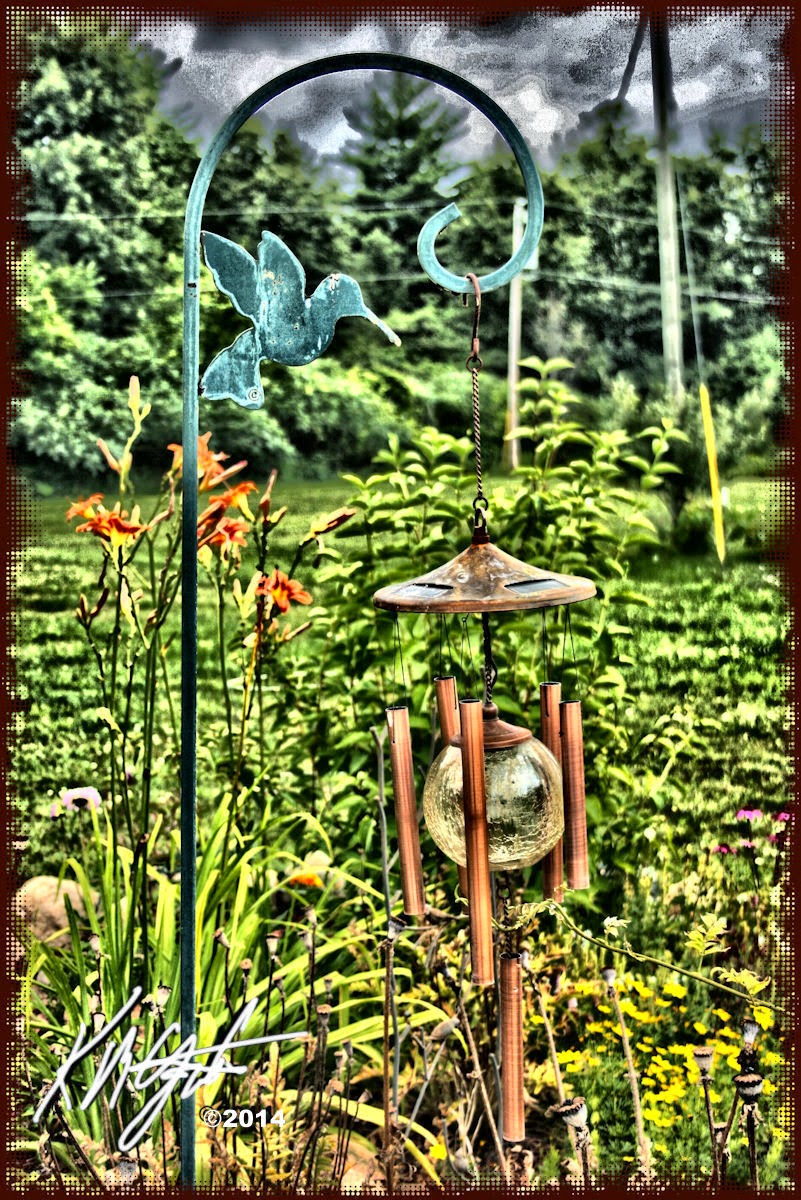
"Hummingbird Hook Globe Chimes" - Corel - "DADGAD Tuning Discussion"

Hummingbird Hook Globe Chimes


I have been very busy this past few weeks. I did this image from a Canon Rebel XTi photograph, taken up North in an area near Clare, Michigan. I opened the photograph in Corel PhotoPaint.

I used the Local Equalization tool on it, then applied the Tone Curve, adding depth to the color. I kept my image processing fairly straight forward. I added a Half-Tone frame with Filter Forge's Frames. I saved the large iteration.

I re-opened the image in Corel PSP Pro X3. Here I upped the color with a Saturation Vibrancy Boost. I added my signature as a layer in Black and then a layer in White. I saved the file in display size for this post.

I also have done some work musically. I now own a used Line 6 Pod XT Live for use with my recording. It is primarily a guitar Pod but I attempted to use the Gearbox software (from Line 6) with it and used a Clean guitar setting for recording with my Shure PG58 Mic.

I played and sang the basis of a DADGAD tune and recorded it with Audacity. Though I am still having some Latency problems with Audacity, but have learned a work around for that until I get my settings right. I then recorded, with my 12-String Seagull plugged in, using a setting called Clean Sweep and laid down a lead track.

I re-plugged in my Shure Mic and did some more vocals in a new track. I adjusted the tracks to match, and Mixed and Rendered to a Stereo file. Saving as a large Wav export and then an MP3 export of a different name.

I shared it with two friends and I have been told it sounded like a late 1960's style tune. Which I don't mind as I like the period of my roots in guitar playing and singing. I was pretty impressed with the results of my experiment with the Pod XT Live and Gearbox, recording with the free source Audacity.


Monday, May 19, 2014

"Vintage Dodge Truck Digital Watercolor" Corel - Paint.NET

Vintage Dodge Truck


Since I had such an enjoyable time recently painting the Vintage Ford Truck I decided to digitally paint another Vintage Dodge Truck. I first located my folder of truck photographs taken with my Canon Rebel XTi and selected this closeup. I opened it in Paint.NET.

In Paint.NET I applied the Effect, Artistic, Ink Sketch for a Pen and Ink image. I saved that iteration and opened in Corel Painter 11.  Here I chose a basic palette and Watercolor Brushes for the digital painting.

After I saved the finished painting I opened in Corel PSP Pro X3. At this point I applied the Saturation Vibrancy for a boost to the colors. The original photograph was of a dirty, rusty brown color. With the  greater part of the background being foliage I used various greens for that area. I needed some punch to those duller colors. I did not clone paint this I did it Freehand.

I added a brown border and my white signature and with the Image Information added a Title, Copyright, and Camera, plus programs used to the Information.

I saved the large iteration and resized for display. Be sure to click on the image for the larger view!


Monday, May 12, 2014

"Vintage Ford Rust Orange Truck Six" Impressionist Version - Corel

Vintage Ford Rust Orange Truck Six


I just installed Corel Painter Essentials 4 on my main PC. It allows you to select a painting style. the colors type, the paper roughness, etc. Then you can allow the image to be Auto-painted in that style with your selections.

So one more time I grabbed the Vintage Ford Rust Orange Truck for an image. I opened in Painter Essentials and selected the Impressionistic style with basic color, and Rough Paper. I pressed Start and the program "Painted" the image for me. I saved the large iteration.

I opened it in Corel PSP Pro X3 and used the Saturation Vibrancy tool set at 33 for a boost to the colors, which those of you who read my posts know I like to do. The Orange and Blue and Green's dominated the image.

I added Image Information, Title, Copyright, Camera used and Programs used. I saved that and then resized to display size to post here.

I thought I was done with this series of the Vintage Truck, but I wanted to try out the Auto-Painting of Painter Essentials 4 again. I hope you enjoy the Impressionistic image I have shared.

Friday, May 2, 2014

"Vintage Ford Rust Orange Truck Three" Corel

Vintage Ford Rust Orange Truck Three


Here is a third view of the Vintage Ford Rust Orange Truck taken one evening recently. I opened the photograph with Corel PSP Pro X3 and kept my approach to enhancing this photograph simple.

I applied the Saturation Vibrancy set at 33 to it for punching up the colors. I only added my white signature and a black border to this photograph. I saved the large iteration with Image Information, Title, Copyright, Program used and the EXIF data.

As you can see on the sign on the back of the Truck it had been used for the Oak Haven Farm Market in the past. You can almost imagine the Truck loaded with fresh vegetables for the Market, traveling there to sell it's wares.

I also like the large Barn in the background, as the surrounding ground is just now greening up with vegetation. It is sitting right on the property near the paved road where we parked so I could photograph it. I have wanted to do so for some time and that evening I had my Canon Rebel XTi ready and fully charged for use. I, unfortunately, am not always that prepared.

Thursday, May 1, 2014

"Vintage Ford Rust Orange Truck Two" Corel

Vintage Ford Rust Orange Truck Two


I took this photograph with my Canon Rebel XTi, I pointed the camera directly into the Sunset. Thus you will see Rays of the Sun behind the Vintage Ford Truck. It also adds white space to the upper portion of the photograph. I opened the photograph from Picasa 3.9 with Corel's PSP Pro X3.

There I applied the Smart Photo Fix tool. After That I adjusted the image with the Saturation Vibrancy tool set at 33. I also used the Curves tool to add depth to the color of the Truck and surrounding grass.

Using the Picture Frame tool I applied a jagged edge to the image, and a black border. I opened my white and black signature file and added it to a new layer, using the property Lighten I made the black transparent. I used the Highpass Sharpen tool for addition details. I saved the large iteration with Image Information of a Title, Copyright, programs and camera used, along with the EXIF data.

I then resized the image for display here.

I have other angles in photographs that I will garner some of the best for additional examination on the blog.

Sunday, January 12, 2014

"Shadow Guitars" Paint.NET - Corel Painter

Shadow Guitars


I have been remiss in not posting, but I have been quite busy lately. I am now trying to get some new photographs of my Seagull S12 Guitar for new images. This began as a photograph of two guitars with deep Shadows.

I opened the photograph in Paint.NET and applied the Effect, Artistic, Ink Sketch to it without color resulting in a black and white image. I saved that large image. I then opened it in Corel Painter 11 and painted it with various watercolor brushes. I boosted the Saturation in Painter and saved that iteration.

I created a signature file for my copyright for 2014, in a PNG file format. I opened both in Corel PhotoPaint and added the halftone Frame in Filter Forge Frames with a greenish cast. I added the signature to it and saved that iteration.

I opened the file in Corel PSP Pro X3 and added Image Information, Title Artist name, Copyright, etc. I saved the resized file for display.


Wednesday, January 8, 2014

"Inverted Snow and Trees - 2" Paint.NET Large

Inverted Snow and Trees - 2

Another Paint.NET image, I used the Ink Sketch Tool then Inverted the results. Very simple workflow. There are so many Snow images on the Interweb these days! I thought the Inverted would be a different way to share among the many, many pictures.

I added a Title and Copyright in Image Information with Corel PSP Pro X3. This was taken at the beginning of the great Polar Vortex Winter of 2013-2014.

Hope you all are warm and safe!

Thursday, December 26, 2013

"Brandon Gardens Winter Land 3 and 4" Canon - Corel

Brandon Gardens Winter Land 3

Brandon Gardens Winter Land 4


Prior to the Sun coming out for a few minutes I took a few more photographs around our home. Brandon Gardens Winter Land 3 and 4 are the resulting images.

I used our Canon Rebel XTi DSLR for getting these shots. I uploaded to the computer and opened with Corel PSP Pro X3. There I applied the Smart Photo Fix tool, increasing the brightness, sharpening, and shadows a bit.

A simple post for today, as I am fairly busy with other pursuits. Thank you for looking!

Tuesday, December 24, 2013

"Brandon Gardens Winter Land 1 and 2" Canon - Corel

Brandon Gardens Winter Land 1

Brandon Gardens Winter Land 2


Like most of us who love to photograph, I could not resist a few Winter Land photographs of our neighborhood Brandon Gardens. The Sun was out and lower in the sky between 9 and 10 o'clock today. I shot these with my Canon Rebel XTi DSLR.

I loaded them onto the computer and opened up these two in Corel PSP Pro X3. To enhance the blue colored shadows I used the Saturation Vibrancy tool. I added a text copyright on the photographs. And with Image Information I added Title, Copyright, Tools used, as well.

I added a twenty-five pixel black border to both to help them show clearly in the post. Click on each image for the larger view.

It was bitter cold out as we ran some errands today. But so beautiful with the sun shining on the trees and bushes a true Crystal Winter Land.

I had some bad news the other day. I cleaned my Wacom Tablet and Pen with soap and water, and it hasn't worked right until today. My guess is the water had to dry completely prior to it's working correctly again. So, be forewarned if you have a Wacom Tablet and Pen, Wash with very little soap and water or it may refuse to work for days!


Tuesday, November 26, 2013

"Freehand Drawing Vintage 1980, Acrylic coated Pastel Man" Corel - Canon

Old Man Sleeping India

Pencil and Pastels Man Acrylic Coating


Digging through my past works that my son found stored away I have these to share today.

"The Old Man Sleeping India," was a freehand drawing made from a photograph that my Dad took while stationed in India during the Korean War. It is a circa 1980 Color Pastels Pencils Drawing.

The second image is a fictional "Man's Portrait," done freehand in Pastels, this was drawn on old packing paper, with the brown of the paper showing through. I took a few photographs of it and this was the clearest, I used the flash so you can see the Acrylic Coating Media I used to preserve it.

With both photographs, taken with my Canon Rebel XTi, I adjusted in Corel PSP Pro X3. Cropping, some color enhancements with Saturation, and a framing with boarder on the second image.


Saturday, November 23, 2013

"Freehand Drawing Retro Pencil Sketches" Corel - Canon

Blunt Cut Hair Woman Pencil

Large Eyes Man Pencil

MAC - Amiga - IBM Computers on Iceberg

Not much to explain in the way of workflow on these Retro Pencil Sketches. I scanned two of them in with my Canon MP495 and captured the third with my Canon Rebel XTi camera.

Some adjustments made in KPT Collection, Corel PhotoPaint, Corel PSP Pro X3; in regard to sharpness and clarity and size for posting. As you can see the Pencil Sketches are from 1998 and I don't recall the original date of the Computers Sketch.

I wondered about where my thought process was when I added the Three Competing Computers on an Iceberg! Go Figure! Computing power has come a long way since this MAC and Amiga and IBM PC!


Friday, November 22, 2013

"Garden Lady Colored Pencils" Corel - Canon

Garden Lady Colored Pencils

My son was rearranging a closet for us and found a case with some of my older Freehand Drawings and Paintings. "Garden Lady," is one of those. I got out my Canon Rebel XTi and took some photographs of the artworks. This one is the first one I worked on for display here.

I copied my Medium sized photographs to the Hard Drive and viewed them, deleting a few that were very poor quality (operator error.) I opened "Garden Lady," in Corel PSP Pro X3. I did some cropping, and used Saturation Vibrancy and Color Curves on the photograph. I imported my signature PNG file, which unfortunately it had some pixelization to it.

I added a Polaroid frame and a border to the image. I saved the iteration with Image Information including Copyright, Title, Artist. I then resized for sharing here.

I have a few other images to share in subsequent posts.

Monday, September 23, 2013

"Red Chair HDR Lomo" Picasa 3.9 - Corel

Red Chair


Scanning through my external archives I ran across this photograph of a Red Chair taken in a retail store. I opened it in Picasa 3.9 and close cropped it of extraneous information that added little to the composition. I liked the experimental angle the photograph was taken at.

I next applied Picasa's HDR feature, adjusting the strength and radius. I then added the Lomo feature for more depth and shadow play.

I took the image into Corel PSP Pro X3 to add Image Information and my signature. I did that and saved the large file. I then resized for display here.

Off the beaten path for my posts and images. But I am still enamored of the grain of wood, and this image does have that.

Wednesday, September 18, 2013

"12-String 6-String Guitars over Seedum" Corel PSP Pro X3

12 and 6 String Guitars over Seedum


Today I took some photographs of our Seedum an Autumn flower. I also had a couple of shots of the 12-String and the 6-String guitars. I opened Corel PSP Pro X3 and layered the three photographs. With both the Guitars I used the Effect Art media effects, Black Pencil also adjusting each with Albumen type color for a touch of brown.

I took the Seedum photograph and rotated it to portrait. I copied and pasted as new layer as the third layer. Before I merged the layers I applied the Saturation Vibrancy. I also used the Art Brushstrokes, More Speckles, to blend the macro into a painting like background. And Curves to adjust the Luminescence.

The soundholes of the guitars almost match up but the necks are clearly at angles. The bridges are not as noticeable but you can see them at the large size on my screen without much difficulty. The guitar bodies show up as curving lines in the midst of the Rose and Green of the Seedum background.

I used Multiply for the Guitars and added the Seedum with opacity changes. I Merged (flattened) the layers, added my signature with the Visible Watermark, and saved the large iteration.

I then resized the image for display and saved with a differing name.

I have been receiving invitations to enter contests or display on differing websites, but I carefully think about such offers. Some cost money to enter per three images, but I am always in a quandary about which of my images are the best.

During your viewing of my blog, if you have a favorite image comment on it or share it with a Google +1.

You would be helping me pick out my best images and that would be fantastic! Thanks you!


Saturday, August 31, 2013

"Leftovers from the 2013 Dream Cruise" Collage - Picasa - Corel

Vintage Tidbits Collage


I had some more photographs left over from the 2013 Woodward Ave Dream Cruise, I opened Picasa 3.9 and selected four, two with headlights, two back ends, of some of the cars I had photographed.

I picked build Collage in Picasa, made some appropriate selections for the Digital Collage and had Picasa make it. Being that the overall collage was a large piece I opened Corel PhotoPaint and resampled to a workable size.

Once in PhotoPaint I applied the Adjust, Local Equalization tool for texture and an HDR look. Getting back color depth and punch I used the Tone Curve Luminosity curve and pulled it down in the center of the graph. Then I selected Effects, Filter Forge's Photo Effects, Vibrancy for additional punch to the colors.

I saved that iteration and opened with Corel PSP Pro X3. Here I applied the Sharpen High Pass Sharpen Overlay. Back in PhotoPaint I added my signature in white, and saved again with some compression for display.


Sunday, August 25, 2013

"2013 Woodward Ave Dream Cruise V" Corel PSP Pro X3

Ford Fairlane 500

Vintage Custom DeSoto


I have two more photographs I wanted to share with you from the Detroit Metro Woodward Ave Dream Cruise of 2013.

I shot a Red Ford Fairlane 500 Convertible as well as a Vintage Custom Blue DeSoto. I opened the photographs in Corel PSP Pro X3 and made a few adjustments.


  1. Digital Camera Noise Removal
  2. Smart Photo Fix
  3. Saturation Vibrancy for punch to the color
  4. Sharpen High Pass Sharpen Soft Light
  5. Backlighting light setting
  6. Image Information - Title and Copyright information
  7. Visible Watermark for my signature


This is the basic workflow I used on both photographs for enhancing them in PSP Pro X3. I have been relying on PSP more for my basic adjustments and try to keep them to a flow that works to make the photographs appear better. Sometimes the original exposures need a little help.

I hope you have enjoyed the photographs of the 2013 Dream Cruise.We saw many cars speeding and peeling out and the noise was amazingly loud as they did. We took a little trip a further down South on Woodward but hit a huge back up of cars and decided not to wait in the jam of it all. So we did not make it down to the MoPar section of the Cruise.


Wednesday, August 21, 2013

"2013 Detroit Metro Woodward Ave Dream Cruise II" Paint.NET - Corel PSP Pro X3 - PhotoPaint

1957 Chevy Bel Air

Vintage Chevy Pickup Truck

Vintage Custom Carmel and Brown


I opened Picasa 3.9 browsing to my Dream Cruise Car folder. I selected my next Photograph, a 1957 Chevy Bel Air. Cropping it I focused upon the Chevy, I saved that crop. I then opened with Paint.NET where I applied the Effects Artistic Ink Sketch with full color and lessening the Ink pen.

I upped the Saturation and I Sharpened the image a bit. I then saved it again. I reopened with Corel PhotoPaint. Using the KPT Collection's Lens Flare to add a flare touch. I Inverted my signature to white and added it and saved the large iteration.

I opened with Corel PSP Pro X3 and I Sharpened with High Pass Sharpen. I also added the title and copyright to the EXIF image information using Image, Image Information.

My next photograph, Vintage Chevy Pickup Truck, I opened in Picasa and applied the HDR tool. I decreased the Radius and Strength. I saved that iteration and opened with PSP Pro X3. I applied the Digital Camera Noise Removal. Then I used the High Pass Sharpen tool on the image. I increased the Saturation by a third. I added my signature with Visible Watermark tool.

From the Organizer in PSP Pro X3 I next chose a close up of a Carmel and Brown Coupe, of which I know little. I cropped this as I took the photograph because the owner had a McCafe cup on top of the roof. But I really liked the Harley Davidson Eagle parking lights.

I used the Digital Camera Noise Removal, Smart Photo Fix, and High Pass Sharpen on the image. Then I applied the Saturation Vibrancy for a punch to the color.

I hope you enjoy the photographic images I have from the 2013 Dream Cruise. I have more to post and will be away from the Guitar motif for a while yet. Thanks for looking! Remember to click on the images for a larger view!