Pages

Monday, January 31, 2011

Tower and Arches - Watercolors - Painter 11 - PhotoPaint


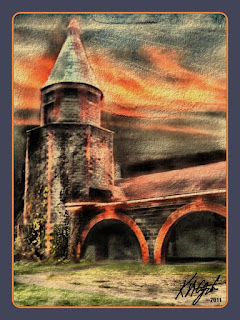
I have more time today to paint, so I selected this image of a tower and arches from browsing in Picasa 3. I opened with PhotoPaint and enlarged it using the Image> Resampling>. Then I applied Local Equalization to it to lighten the whole image. I saved that file.

In Picasa 3 I next opened with Painter 11 and did a quick clone of the piece. I selected the Watercolor brushes, the Fine, Wash and Run brushes and began painting. I used the soft cloner brush to add back in a few details like the bricks and plants. I went to Apply Surface Texture and selected Paper and adjusted the paper to add Texture.

Saving that as a jpg, I reopened it in PhotoPaint and adjusted the depth with the Tone Curve slightly. I added a border to the piece and then used Filter Forge for the frame, adjusting the round corners, and the second color to an golden ocher.


----------------
Now playing: Ian Anderson - A Raft Of Penguins
via FoxyTunes

Saturday, January 29, 2011

Alphonse Mucha Digital Collage - Art Nouveau - PhotoPaint


Today I wanted to do a Digital Collage. I had just received some Alphonse Mucha clip art from Dover Publications and decided to use that plus some additional Art Nouveau clip art also from Dover.

I opened Picasa 3 and browsed for a background in Mayang's Textures and found a textured glass image. I opened with PhotoPaint and selected a portion of that and copied it to the clipboard and pasted an File> New from Clipboard>.

I set this as the background with Shift CTRL DnArrow. Back in Picasa I browsed the Recently Updated picture file and located two Alphonse Mucha images. I copied and pasted them into the background in PhotoPaint. I used the Object Property> Lightness> to add some transparency.

I browsed my Dover Publications clip art for more Art Nouveau like art. and added a banner at the bottom and I mirrored a Face at the two opposite top corners.

Alphonse Mucha is one of my favorite Art Nouveau artists, [click here] for the Mucha Foundation website for further information on this artist.

----------------
Now playing: Inxs - Not Enough Time
via FoxyTunes

Thursday, January 27, 2011

Flowers - Gouache - Worn Oil Pastel - Digital Watercolors - Painter 11


An exercise in Painter 11 using Gouache brushes, Worn Oil Pastel brushes, and Digital Watercolors. I selected a floral image in Picasa 3 from my Dover Publications collection of samples.

I opened this in PhotoPaint to resample to a larger working size and saved that file at 96 dpi. I reopened it in Painter 11 and selected the Gouache brushes for the flower petals and the Worn Oil Pastels for the leaves.

I selected a couple of different Digital Watercolor brushes for adding the crimson color to the flower petals and the yellow background. I saved the larger file and reopened in PhotoPaint.

There I added a 10 pixel black border using the Papersize> option of Image>. I resized the piece for sharing here.

----------------
Now playing: Metric - Come Back Baby
via FoxyTunes

Wednesday, January 26, 2011

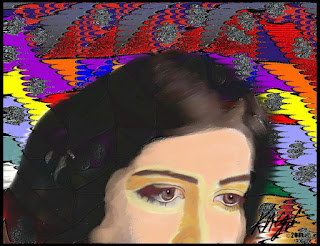
Maze Girl - Painter 11 - CorelDRAW - PhotoPaint


Today's Painter 11 experiment began in PhotoPaint where I opened a Maze from Dover Publications clip art. I copied it to the clipboard and pasted it as a bitmap into CorelDRAW. There I used the Trace Bitmap to create a vector maze.

I selected each piece of the maze and added fills. colors, gradients to colorize the image. From there I copied it to the clipboard and pasted it back into PhotoPaint, and saved it as a 96 dpi image.

In Picasa 3 I selected the saved file and opened it in Painter 11. I first applied blobs to the image for some abstraction. Then I applied the pattern effect to make the wavy lines and colors. After that I opened another portrait file from WetCanvas and used the soft cloner to add it into the piece.

It was a grayscale image so I decided to add color to it in Painter 11. I selected the Tinting brushes to do this adding color from the stock palette. I adjusted and varied the size of the brushes and minimized the opacity. I then selected the Static Pencil brushes to draw in details for the eyes.

I softened the colors using the Blenders brushes. All in all a enjoyable experiment to work on and it is making my day to use Painter 11.

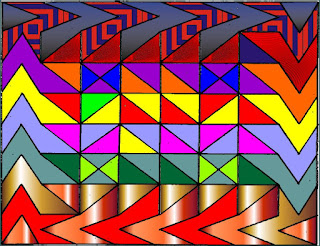
Here is the Maze before I altered it adding the portrait. I thought you might like to see it. It was a vector piece with vector fills and color and gradients done in CorelDRAW. I converted it to jpg for use on the internet.


----------------
Now playing: Avril Lavigne - How Does It Feel
via FoxyTunes

Tuesday, January 25, 2011

Grass Along the Lakeshore - Painter 11


This photograph is of Bald Eagle Lake in Michigan. It was taken by my son Keir M. Gatzka, not far from our house, at evening time. I found this photograph browsing with Picasa 3 through my large collection of images.

After selecting it with Picasa 3 I Opened With PhotoPaint, I applied the Image> Transform> Posterize> set at 7 colors. I also lightened the image using the Tone Curve. I saved this file and opened it in Painter 11.

Here I began using the Digital Watercolor Filbert brush on the sky, after doing a quick clone. I set the clone button on for the brushes. I also used a Dry Bristle brush and the soft cloner at the end to add back in the wild grass.

Back in PhotoPaint I added the Watercolor frame, using Filter Forge, and a 10 pixel sky blue border, saving the large file as a jpg. Then adding my signature I resampled the large file for sharing on the internet to 1200 x 801.

----------------
Now playing: Kirk Mathew Gatzka - Draw Closer - DADGAD
via FoxyTunes

New Song above is on my Acoustic Guitar Community song listing if you want to listen to it. Go to the link on the right side of the page and click on My Page listing.

Monday, January 24, 2011

Curly Haired Young Lady Portrait - Painter 11


The image today started with another portrait from the WetCanvas galleries. This young woman has very curly hair and a pleasant demeanor.

I browsed in Picasa 3 and located this image then I opened with Painter 11. I applied the Quick Clone to set up the tracing paper for painting the image. I began with the Pencil cloner for the hair to imitate the curls. I switched to the Oil Bristle cloner for the face and neck and dress. This gave me an impasto quality to those portions.

Using the Soft cloner I added the eyes, eyebrows and mouth for finer detail. I used the Camel cloner to go over the hair and fill it in, adding the background with it and the Soft cloner for the drapery and wall paper details.

I used the Pencil cloner for the eyes to give them a more painterly appearance. And used the Soft Cloner to add back in detail to the curly hair, especially the crown and edges, which shows much more detail.

I am still using the Tracing Paper as I am just now getting used to Painter 11. I will journey further away from this as I develop more courage and confidence in my painting abilities.

This second image is from playing with different Brushes and the Image Hose and Textures for a fun exercise in Painter 11.

As you can see it has a variety of Brushes and the Image Hose can add realism to any painting. I did use many new brushes I downloaded that are not native to Painter 11. I painted the yellow orange flowers and foliage with some and then used other watercolor brushes for the sky.

In any event it was an enjoyable experiment with the new tools of Painter 11.

----------------
Now playing: Acoustic Junction - Strange Days
via FoxyTunes

Sunday, January 23, 2011

A Man's Portrait - Painter 11 - PhotoPaint


With yet another portrait from WetCanvas, I decided to do a man's face this time. The crop isn't the best as the top of his head was cut off, but the face was interesting enough for an attempt at painting it.

I opened Picasa 3 and browsed for the new photographs and found this one that I had saved. I right clicked on the photograph and selected open with> Painter 11.

As I am still learning Painter 11, I again selected a quick clone for a prepared a tracing canvas. I had downloaded some new brushes, though I haven't cracked open all of the brushes native to 11, and began with Static Pencils cover brush. I sketched the entire face using these pencils.

To begin adding color I selected Textured Acrylics, iAcrylics Tex 20 and activated the clone button. I began to fill in the face with this brush. I tried to follow the contours of the face, and left white space on purpose. Next I used the Tint brush to add back in color to the hair.

I selected the Soft cloner for some detail on the ear, eyes, nose and mouth, I used it very sparingly. Then I selected the Acrylic brushes for the shirt and background using varying shades of Ocher for it. I applied the Distortion Grainy Distorto 30 to the background for added texture.

I resampled my large file in PhotoPaint for sharing here, and saved the file as a jpg.

----------------
Now playing: Kirk Mathew Gatzka - Why I Hurt
via FoxyTunes

Saturday, January 22, 2011

Redhead Portrait - Painter 11 - PhotoPaint


Another portrait from WetCanvas forums, an intriguing redhead. I opened it in Painter 11 and did another quick clone. I began with the Camel Oil cloner and did the hair first, trying to capture the redhair and it's waviness along with it's straightness.

I used the Oil Brush for the face, hand, arm and neck. I added a little bit more detail of the eyes, eyebrows, nose and mouth using the Soft cloner. For the rest of the painting of the woman I used the Fine Gouche cloner.

I switched to a new layer for the background, selected a sky blue color and a coral green along with a pink selection with the pick up tool, using an Oil brush. I used Distortion brushes to alter the background. The Bulge, Hurricane, and Distorto
brushes.

I saved this file as a jpg for the internet. In PhotoPaint, I added a 10 pixel sky blue border adding to this a blue green border. I selected that with the wand and applied the Texture> Plastic> effect to it for the shadows.

----------------
Now playing: Kirk Mathew Gatzka - Clear Way On
via FoxyTunes

Friday, January 21, 2011

Bold Color Portrait - Pencils - Painter 11


I belong to WetCanvas Forums and they have photograph galleries there. I searched on "portraits" and found a few new ones I haven't seen before. I opened this one in Painter 11 and decided to have a little fun with the image.

I selected the Pencils 2B pencil and began to color using selections of flesh tones and pinks for the face and golden colors for the hair. I used the 2B pencil for the image by resizing it various times. I wanted a colorful piece that had shapes and a bold appearance.

I also used some blenders, the blur and just water blenders to soften the piece. I have a few more portraits to select now and will be doing experiments with the different media in Painter 11.

I took the jpg file and opened it in PhotoPaint and resampled it for display here and added a photo frame with Filter Forge.

----------------
Now playing: Tony Furtado--Medley: I Will, Hazel Comes Home & The Bawds of Euphony
via FoxyTunes

Thursday, January 20, 2011

Painter 11 Upgrade - First Image - Trees


Now that Painter 12 is in Beta Testing I've finally Upgraded to Painter 11! I received my package today and after doing some other business on the computer I installed the program and also installed a couple of patches for it.

The image being displayed is my first Painter 11 image. I selected a photograph of this huge tree with smaller ones in the background taken the same trip up Dixie Highway North, when I photographed the rusted old Dodge truck which I have shown here on the blog.

To make things easy on myself with the new program I selected the Quick Clone after I loaded up the photograph. I used the Bristle clone brush for the trees and for the foliage I used the Soft cloner and the watercolor cloner. This gave me details of the leaves, plants and ferns.

A simple approach but with instant results. After all I still made the brushstrokes and applied the softness of the image. So to me it is a digital painting.

In PhotoPaint I applied the Tone Curve and upped the saturation by 7. Then I added green borders for framing the piece. Here I resampled it for the internet to 1024 x 681 72dpi.

Thus far I like what I see in Painter 11. I am happy I upgraded.

----------------
Now playing: Kirk Mathew Gatzka - Rockin' DADGAD
via FoxyTunes

Wednesday, January 19, 2011

Vintage Tractor and Farm Implements - ArtRage Oils - PhotoPaint - Paint.NET


I had this older image that I had done in Paint.NET using the Ink Sketch filter at 800 x 600 pixels. I took the image and resampled it in PhotoPaint to 1024 x 768. I also used the wand to select the white sky and filled it with a sunset.

Saving that I opened it in ArtRage 2.5 edition and using the Oils brush I painted the tractor and the background, using the tracing paper. I resized the Oil brush various times and ended up with a simple oil painted file.

I reopened that in PhotoPaint and also opened the 1024 x 768 image of the ink sketch. Copying that to the clipboard I pasted it into the Oil painting. There I resized it to fit the larger ArtRage file. As an object (layer) I selected the property Multiply to add some transparency to it. I merged both images. Now I had a painterly image with pen and ink details.

I adjusted the image with the Tone Curve, lightening it up a bit so the colors and brushstrokes would show better. I used Filter Forge to add a watercolor frame narrowing it to allow more image to show. To this I added a 10 pixel black border.

----------------
Now playing: Kirk Mathew Gatzka - You Gotta Be Crazy
via FoxyTunes

Tuesday, January 18, 2011

Robison Hardware Building - Paint.NET - PhotoPaint


Continuing with a building motif I browsed in Picasa 3 and did a search on "buildings" and came up with this photograph. Taken by my son Keir M. Gatzka, I believe in Toledo, Ohio. "Rolison Hardware," was established in 1914, but this location was built in 1923.

I used Paint.NET and applied the Ink Sketch filter with color full up and the ink reduced. I saved the file and opened in PhotoPaint where I resized it for the web. Did some cleaning up of the white sky, selected it with the wand and filled it with a sunset fill.

I used the Tone Curve for depth and increased the saturation by 7. I added a brick brown border of about 50 pixels. I selected this with the wand, and applied the 3D Bevel effect. With the mask still in place I applied the Effects> Texture> Plastic> filter to the frame, using the brick red color again.

----------------
Now playing: Blue Edge of the Prairie - My Misery
via FoxyTunes

Monday, January 17, 2011

Historic Fishtown - Painter Pen and Ink and Watercolor


Traverse City, Michigan area has many local spots that highlight older times. "Historic Fishtown," is one of those places. This photograph was taken by my son Keir M. Gatzka a number of winters ago.

I opened the photograph in Painter, cloned it and selected all, cleared the clone and turned on the tracing paper. I chose the Pens> Ballpoint> pen for drawing the basic outline of this historic building. This took some time because of the detail of the stairway and windows and door.

I then selected a watercolor layer and proceeded to paint with a Dry Bristle brush, doing this with the tracing paper turned off. I painted the building with the clone button selected, though the original photograph had little color in it, it made for a nice texture.

This also took some time as the brush was kept smaller for a slanted board appearance. I saved the large file and opened it in PhotoPaint. Here I added a 20 pixel black border for a frame, and resampled it for the web.

----------------
Now playing: JJ Cale and Eric Clapton - Sporting Life Blues
via FoxyTunes

Sunday, January 16, 2011

Two Guitars - Digital Watercolor - Texture - Painter


I began again with a photograph of a 12-String and a 6-String guitar, taken by me. I opened the photograph in Painter and cloned it. Selecting All I cleared it and turned on the tracing Paper using CTRL_T.

I selected a dry bristle brush in Digital Watercolors and painted the two guitars. I used a broader brush for the background, also adding salt to that. I used the soft cloner to add back in the strings and pins and tuning pegs.

I used Filter Forge for the watercolor framing changing the color to a rust brown and narrowing the frame size. In Painter I used the Apply Surface Texture> Image Luminance> for more texture.

----------------
Now playing: A.I.C. - No Excuses
via FoxyTunes

Saturday, January 15, 2011

12-String Seagull Guitar and Case - PhotoPaint


Here is my 12-string Seagull Guitar in it's hard case, a photograph taken by myself. I used one of Mayang's Textures for the background, a fabric piece. I cropped the background to show the weave clearly in PhotoPaint.

First I opened the photograph of the guitar and case and cut out the guitar and case. I then used the eraser to clean up the interior of the object. I used the object property If Darker for transparency. This allowed the texture to show through and gave it a grunge look and feel.

For interest I added a couple of Dover Publications clip art, as you can clearly see the old vintage camera and the bottom. I added the hand in the right hand lower area and a couple of vintage symbols in the left and right upper corners.

Using Filter Forge I selected a grunge frame which partially obscured some of the clip art symbols.

I like the glowing effect of the guitar. I also applied opticVerve's Photography filters using the Slide #2, 1600 ASA and the Warm effect. This gives more texture as you look closely at the finished piece.

----------------
Now playing: Kirk Mathew Gatzka - A F#m F7 E A Run
via FoxyTunes

Friday, January 14, 2011

A Conversation with David - Paint.NET - PhotoPaint


A candid photograph taken by my son Keir M. Gatzka of David Benjamin, a photographer and musician. Here they were conversing in a relaxed atmosphere.

I browsed for the photograph in Picasa 3 and selected this composition. I opened it in Paint.NET and applied one of the painterly filters to the large image.

Next I applied the Ink Sketch filter with the color turned all the way up and lessened the ink lines. I saved the file and opened in Picasa 3 again, then in PhotoPaint. Then I used the Tone Curve for depth and upped the saturation by 7. I added a film frame from Filter Forge and resampled the image for the web.

It is one of my favorite techniques for a digital manipulation of a good composition. It is simple yet exerts a painted quality plus pen and ink. I also liked the candid shot and the relaxed atmosphere of the original photograph.

----------------
Now playing: Alan Parsons Project - Let's Talk About Me
via FoxyTunes

Thursday, January 13, 2011

Another Pretty Face - Painter - PhotoPaint


I began today with a photograph of a pretty young lady from morguefile. I opened it in Painter and cloned the image. I then selected all and cleared it. Using Colored Pencil #7 I applied an Auto Clone muck up of the image.

While in Painter I applied Acrylic brushes and Digital watercolor brushes and did some soft cloning on the eyes, nose and mouth.

I saved the large file and opened it in PhotoPaint where I resized it for the web. I applied the Effects> Texture> Plastic> with a light pink tint. Which gives it some unique highlights. I applied the Tone Curve for depth and increased the saturation slightly.

I then finished with a Filter Forge photography frame. Cropping the focus to the face more than the greenery in the background.

----------------
Now playing: Bee Gees - More Than A Woman
via FoxyTunes

Tuesday, January 11, 2011

Cropped Egyptian Beauty - CorelTRACE - CorelDRAW - Painter - PhotoPaint


I began this exercise with a photograph of an Egyptian beauty. I used the image in CorelTRACE and made it a vector graphic, which much simplified the colors and details. I opened it in CorelDRAW and copied it to the clipboard. This I pasted into PhotoPaint.

I resized the image in PhotoPaint and then saving it as a jpg, I opened it in Painter. There I used the Digital Watercolors to create a muck up of the woman's face. I added an Acrylic brush Auto clone and then used the soft cloner to add back the detail of her mouth and eyes and nose.

I used the Effects> Texture> Plastic> with a light peach color on the image

I applied optiVerve Labs Virtual Photographer using the settings of Slide #2, 1600 ASA, Warm, Effect> Wash> to adjust the piece.

Still in PhotoPaint I cropped the resulting image and used a Photography frame from Filter Forge.

----------------
Now playing: Bob Dylan - Just Like A Woman
via FoxyTunes

Monday, January 10, 2011

12-String - 6-String Guitars - Digital Watercolor - Painter


As you are aware one of my favorite motifs is guitar images. This digital watercolor began as a photograph taken by me with my Canon Rebel XTi.

I opened the photograph in Painter 8 and cloned the image. I enlarged the image on screen to work on it and selected all and cleared the canvas. Using CTRL-T I turned on the tracing paper. I like watercolors so I selected Digital watercolor brushes for this image and painted away with the clone button selected.

This gave me a very loose image to work with. I used short to medium brushstrokes for the looseness. I love the way the brushes overlay one another. I painted the two guitars and then turned off the tracing paper. I used a mop brush for the background and added some grayish lines and then used the salt brush.

To add back details of the push pins and strings I selected the soft cloner brush. This was done just enough to bring in touches of detail.

I saved the large file and reopened it in PhotoPaint. I added a 10 pixel walnut brown border and my signature. Here I resampled the image for display on the web.

----------------
Now playing: Kirk Mathew Gatzka - ADEE7 Deep Movers
via FoxyTunes

Sunday, January 9, 2011

Vintage Tintype - Paint.NET - PhotoPaint


I enjoy Vintage art and here is an old tintype style photograph that I used today to be creative with it in a digital form. I opened the tintype in PhotoPaint and enlarged it I then saved that file.

In Paint.NET I used the Adjustments> Curves> to Lighten the photo and then applied Effects> Artistic> Pencil Sketch> with the pencil size increased and the range increased. I also applied the Ink Sketch filter there. I saved that file and reopened it in PhotoPaint.

There I browsed my Mayangs Textures for a brightly colored paint with rust background and cropped out a portion for the background. I then went back to the tintype and created a tritone for the brownish look and feel of an engraving and ink. I copied it to the clipboard and pasted it into the background. I applied the object property Multiply for transparency.

I browsed my Dover Publications Clip Art and found a stained glass piece. I copied and pasted that using the Multiply setting and enlarged it to fit the other half of the image. I merged all objects to the background.

Using Filter Forge's frames I applied a variant of the simple frames with curved corners. I applied the wand to the off color I chose to recolor it with Yellow to match the background. With the mask still applied I used Effects> Textures> Plastic> for a shadowed appearance. Then I used a film frame to complete the image.

Credit for the tintype photograph goes to Elderly Instruments.

----------------
Now playing: Kirk Mathew Gatzka - Lil' Miss Lillian Decides
via FoxyTunes

Saturday, January 8, 2011

Dual Guitars - Painter - Liquid Ink - Watercolor


I browsed through my guitar photographs and selected one of my favorites for this piece. I opened the photograph in Painter and used the Liquid Ink and Digital Watercolor brushes to render this painting.

I like the thickness of the Graphic Ink brush and the watercolor brushes. I cloned the original and enlarged it on screen and cleared the workspace then used CTRL-T to use the tracing paper. I kept the process simple as I wanted a likeness that showed enough details, like the strings.

The 12-String is my Seagull and the 6-String is my son's Lyon guitar. I had them both for a while when this photograph was taken. I applied Filter Forge's watercolor frame and saved the large file.

Opening it in PhotoPaint I used the wand tool to select the white space surrounding the image and applied the mask. I used a fill type of wood to finish the frame. I resampled the image for display on the web.

Stay With You by Gatzka Music
----------------
Now playing: Kirk Mathew Gatzka - Pages Without Numbers
via FoxyTunes

Friday, January 7, 2011

Come Again, Come Again - My Paint - PhotoPaint


As today's title and artwork suggests I am inviting all visitors to "gatzkART!" to "Come Again!"

Use Feedburners email or RSS or bookmark this site for return visits. Join as a friend among the Special Personalities.

You can also see that I have overhauled the blog to enhance it's appearance. Using a new Blogger template and some HTML and applying a new background, (one of my favorite guitar images that I've done) I gave the "gatzkART!" blog a entirely new look and feel. I hope you enjoy it.

The image displayed started with the free paint program My Paint . I sketched a guitar using the ballpoint pen and the watercolor brushes. I then exported to jpg and opened it in PhotoPaint. There I added a bit to the guitar sketch with brush and fills. I then opened one of Mayang's Textures of bubbled paint and rust for the background.

I copied the guitar to the clipboard and pasted into the texture, replicated it and aligned them. I added a quick snippet of a poem that came to mind with an invitation to "Come Again."

I added a dual frame using Filter Forge and a border and a second film frame.

So "Come Again" and visit often, and your comments are always welcome, of course.

----------------
Now playing: Kirk Mathew Gatzka - Riding With Me
via FoxyTunes

Thursday, January 6, 2011

My 12-string Seagull Guitar


A simple post today. Here is a representation of my 12-string Seagull Guitar. I applied various filters using Flaming Pear in Painter. I added a grunge frame using Filter Forges Freepack 3.

This image started out as a photograph that I modified some time ago and then added the effects mentioned above. It truly is a beautiful 12-string and I am happy to own one.


---------------
Now playing: Kirk Mathew Gatzka - I'm Counting On You 3 Acoustic
via FoxyTunes

Saturday, January 1, 2011

Alaskan River Revisited - Painter - PhotoPaint


I have been busy with a new gadget a VHS to DVD Dazzle DCV100 with Pinnacle Studio 12. I have been digitizing older family VHS tapes to create DVDs from them.

I also am using Windows 7 - Windows DVD Maker to burn multiple copies for family members of the various activities I have on VHS tape. I like the Play Screens of DVD Maker and I also like the basic transitions of Pinnacle Studio.

I took some time today to revisit one of my favorite photographs from our trip to Alaska a couple of years ago. I used Picasa 3 to browse photographs and selected this one. I opened it in Painter and applied Posterize at 8 levels of color. Then I applied the Depth of Field to it. After I added a film frame using Filter Forge's Freepack 3 I saved the file and opened it in PhotoPaint.

Here I adjusted the Tone Curve and the color saturation. I created a signature file using the ballpoint pen brush in PhotoPaint and added the copyright 2011 to it for my first post of the year. I cut and pasted it into the image and used the object property Multiply to add it with transparency.

I am using our laptop for this post which is not what I usually use. but the Wacom tablet is connected due to using this newer computer for the VHS conversions and DVD burning. Not all of my photographic files are on this laptop so I did select from a limited number of files for this image.

----------------
Now playing: The Beatles - Please Please Me
via FoxyTunes